Natural Cooling
Passive cooling techniques can be used to reduce, and in some cases eliminate, mechanical air conditioning requirements in areas where cooling is a dominant problem. The cost and energy effectiveness of these options are both worth considering by homeowner and builders. Contained within this section are rules of thumb and an explanation or the essentials of passive cooling systems.
In many parts of the southwest, summer cooling is as important as winter heating. In the arid part of the country, cooling is the primary design consideration.
Thermal comfort in summer means more than keeping the indoor air temperature below 75°. High temperatures, or high humidity (or both) can lead to excessive discomfort. Fortunately, the regions of high summer temperatures are quite arid (relative humidity is usually low). The only regions of fairly high humidity, the coastal regions, are also among the coolest parts of the region in summer.
There are three major sources of unwanted summer heat: direct solar impacts on a building and through windows and skylights; heat transfer and infiltration, of exterior high temperatures, through the materials and elements of the structure; and the internal heat produced by appliances, equipment, and inhabitants. Of the three, the first is potentially the greatest problem in the southwest, but it is usually the easiest to control. Table 14 lists approximate heat gains from each source for typical single-family detached homes in a climate where the temperature averages 75° F on a July day. The homes are built to local energy codes and are oriented east-west, and have two-thirds of the total glazing facing south. The remaining glass is located on the east and west walls, and all glass is completely unshaded. Even assuming that sunlight could be excluded from the interior in summer (a difficult feat), these homes would experience excess heat loads of 250 to 450 thousand BTU per day in July. Worse yet, the houses would require about 4-8 tons of air conditioning each to handle peak heat gains and keep the rooms comfortable in the afternoon.
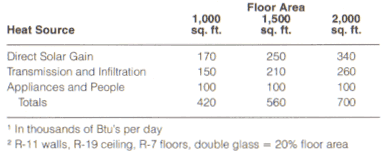
Table 14. July heat gains1 in typical tract homes2.
HEAT GAIN CONTROL
Many of the principles and techniques of passive solar heating are adaptable to natural cooling. Insulation and weather-stripping that prevent heat loss in the winter will also retard heat gain during summer. Movable insulating shutters for winter nighttime containment of heat gain can also be used to reduce summertime daytime heat gains. Inside the house, thermal mass such as masonry walls and floors, act as "heat sponges", absorbing heat and slowing internal temperature rise on hot days, and can be cooled down by nighttime ventilating (at the beginning and end of the summer season) and by use mechanical cooling during off-peak cost hours (nighttime). Suitably placed near a window, skylight, or vent, the same thermal mass can be exposed to cool night air to release the heat absorbed from the space earlier in the day. Finally, earth integrated buildings, embedded into the ground, benefit from the lower difference between interior and exterior surface temperature.
For optimum summer cooling, a building's surroundings should be designed to minimize summer sunlight striking external surfaces, and to prevent surrounding area heat re-radiation and reflection. Great temperature differentials between desert exterior conditions of 110+ degrees and 78 degrees required for interior comfort can be tempered using "thermal decompression" zones that become increasingly more effective as one nears the building. Mitigation of undesirable summer direct sun and thermal impacts is achieved through use of vegetation i.e. deciduous trees which interrupt the summer sun's direct path, and ground covers which prevent ground reflection as well as keep the earth's surface cooler thereby preventing re-radiation. One moves out of intense direct sun and heat through vegetation that filters sunlight and shades the ground; then through a more densely filtered zone with ground covers; then through a patio area with vegetation, trellises and water features; into a tempered building entry ("thermal lock"); and finally into the building proper. This movement, 110 degrees stepping down in stages to 78 degrees, allows the body to adjust properly, and provides the best means of arriving at a lesser differentiation between the building's perimeter wall interior and exterior surface temperatures. It is this difference, between interior and exterior surface temperature, that exacerbates the amount and rate of heat flow through the material. Glazing should be minimized on the roof and the east and west walls where summer sunlight is most intense.
Intense direct solar impacts from the sun rising in the east are equal to those of the setting west sun. The reason we feel the setting sun impact more is due to the added thermal impact of the earth reradiating the heat it has gained during the day. The summer sun is much higher in the sky and has a negative impact on skylights and roof windows and lead to enormous solar heat gains. They should not be used in hot climates unless they are insulated and/or shaded. Vertical south facing glass (windows, clerestories, etc.) with overhangs or shades, present fewer problems but are still adversely affected by exterior air temperature. A horizontal overhang or an awning above a south window is an inexpensive, effective solution. If it protrudes to half the window height (Fig. 21), such an overhang will shade the window completely from early May to mid-August, yet allow for winter sun access. A trellis with deciduous vines can be used. Another good strategy is the use of deciduous trees that shade the south face and roof during the summer. All these shading methods work equally well with Trombe walls, water walls, greenhouses, and other south-wall passive solar collector strategies.
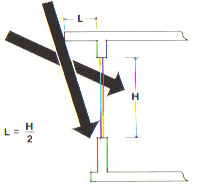
Figure 21. Shading devices should be sized using the above graphic method.
Mitigation for the roof and the east and west walls requires a different approach. Since the sun is low in the horizon during sunrise and sunset, overhangs are not effective for solar mitigation and vertical shading is in order. Vegetation is perhaps the most effective way of keeping the intense morning and afternoon sun off the east and west walls and windows, but care must be taken to avoid blockage of nighttime summer breezes that can be part of the diurnal cooling strategy. If vegetation is impractical, a combination of tinted or reflecting glass and exterior shades or shade screens that roll down over east and west windows are an effective strategy. Additionally, light-colored paints and materials on the roof and the walls are effective in reflecting away most of the sunlight that makes it past your shading.
CONVECTIVE COOLING MODELS
The heat gain control methods discussed above should suffice to keep room temperatures comfortable in houses built where mild summer temperatures are the rule. But there are many other regions of the southwest, particularly the desert areas, where additional cooling will usually be necessary. The next step in natural cooling is to take advantage of "convective" cooling methods - those which use the prevailing winds and natural, gravity-induced convection to ventilate a house at the appropriate times of the day.
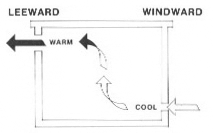
The oldest, straightforward convective method admits cool night air to drive out the warm air. If breezes are predominant, high vents or open windows on the leeward side (away from prevailing breeze) will let the hottest air, located near the ceiling, escape. The cooler night air sweeping in through low open vents or windows on the windward side will replace this hot air and bring relief. To get the best cooling rates, leeward openings should have substantially larger total area (50% to 100% larger) than those on the windward side of the house (Fig. 22).
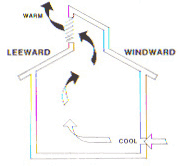
If there are only light breezes at the site, natural convection can still be used to ventilate and cool a house as long as the outdoor air is cooler than the indoor air at the peak of the house. Since warm air rises, vents located at high points in the interior will allow warm air to escape while cooler outdoor air flows in through low vents to replace it (Fig. 23). The coolest air around a house is usually found on the north side, especially if this area is well shaded by trees or shrubs and has water features. Cool air intake vents are best located as low as possible on the north side. The greater the height difference between the low and high vents, the faster the flow of natural convection and the more heat mitigation can occur.
 |
 |
| Figure 22. Locate cool air inlet vent on the building side which receives predominant cool summer breezes. |
Figure 23. To aid in natural ventilation, during summer use high ceiling vaults, and thermal chimneys to promote rapid air changes. |
There are two basic ways to enhance the convective cooling rate: 1) increase the volume of air escaping per minute, or 2) bring in cooler air. If Delta T is the temperature difference between exiting indoor air and incoming outdoor air, the overall cooling rate in BTU's per hour is given by the simple equation:
Cooling rate = 1.08 x V x DT
where V is the volume of air escaping in cubic feet per minute. Table 15 contains sample values of the cooling rate for selected air flow rates and temperature differences. For example, an air flow velocity of 1-2 feet/sec. through a vent of 10 square feet will result in air flow rates between 500 and 1000 cubic feet per minute. If incoming air is 10 degrees cooler than the indoor air, the overall cooling rate will be about 5 to 10 thousand BTU's per hour.

Table 15. Convective cooling rates.
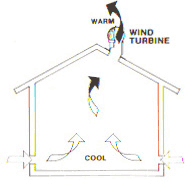
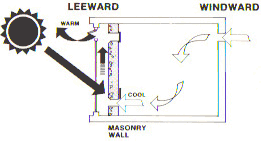
To a point, increasing the vent area will increase the airflow rate by natural convection. Turbine vents at the roof peak are one way to enhance airflow and improve the cooling rate. Even gentle breezes flowing up and over the roof peak create an upward suction that draws out warm interior air (Fig. 24). An even better approach is to use solar radiation to induce a more rapid flow. One of the many possible approaches, shown in Figure 25, uses a Trombe wall vented to the outside. Sunlight striking the concrete wall will heat the air in the space between glass and wall to temperatures above 150°F. This very hot air rises quickly and escapes, drawing cool air into the house through low vents on the north wall. Additionally, specifically constructed "solar chimneys", composed of passive air heaters with seasonal dampers can be incorporated where solar heated air can be dumped into the building in the winter, and used as a "ventilator driver" in the summer to draw outdoor air through a house and ventilate it. Frequently, they can induce air velocities of 1-2 feet per second.
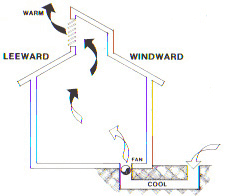
Another convective cooling strategy is the drawing of outdoor air is drawn through tubes buried in the ground and dumped into the house. Made of material that allows easy thermal transfer, these tubes are buried several feet deep to avoid the warmer daytime surface temperatures. Warm outdoor air entering the tube gives up its heat to the cooler earth, and cools substantially before entering the house (Fig. 26). Thermal saturation of the surrounding earth must be addressed, by means of surface landscaping and watering, thereby removing the gained thermal energy from the tube/earth transfers. Though condensation is rarely a problem in dry climates, such tubes should be sloped slightly and have adequate drainage to insure that water build-up doesn't block the passage of air. The intake end should be screened and placed in a shady spot away from foot traffic. When properly built and sized, these underground tubes can supply cool air during the peak load daytime even in the hottest climates.
 |
 |
|
| Figure 24. Wind turbines can be used to increase the ventilation rate of rooms. |
Figure 25. An indirect gain mass wall can be used to significantly increase ventilation rates in adjoining spaces. |
|
| |
|
|
 |
|
|
| Figure 26. By using undergrade air chambers, significant sensible cooling can be obtained. |
|
|
RADIATIVE COOLING METHODS
The exterior water wall and roof pond systems mentioned earlier are also very effective summer cooling strategies. In the cooling cycle (Fig. 27), insulating panels remain closed by day to reject unwanted solar heat. The cool ponds act as "thermal sponges", absorbing room heat conducted through the interior ceiling ceiling (metal deck) supporting them. At night. panels are rolled back, exposing the ponds to the black body of the night sky and to the cooler night air and breeze. The ponds lose heat by radiation to the night sky and by natural convection to the air. Roof pond systems are particularly effective in regions of low humidity and clear summer nights. The conditions exist in most of the southern tier, where the cooling demand is greatest. If conditions are less than ideal, augmented heat dissipation by evaporation can be integrated (see following section).
For best cooling results, ponds can range from 6-12 inches deep, depending on location and local conditions, and should cover as much of the roof as possible. An average tract home in the southwest, with good heat gain control, can easily gain 200,000 to 400,000 BTU's on a hot July day. A 6 inch deep roof pond covering the entire roof, will rise in temperature by only 4-8°F from this heat gain, and with nighttime cooling rates of 25-30 BTU/hr/ft' (Fig. 27), all this excess heat can be released to the outside by daybreak.
A few considerations for roof systems and ponds. They should have an unobstructed path toward the zenith (directly overhead). Adjacent trees, walls and other buildings can impact the cooling rate by reducing radiation to the night sky. Trees and walls also absorb solar heat by day and radiate this energy into the ponds at night. Cloud cover can interfere with the cooling performance of a roof pond system. For this reason, roof ponds are less effective in coastal areas where a low cloud layer or dense fog frequently rolls in off the ocean in the evening. Fortunately, however, such coastal areas need little if any cooling during the summer.
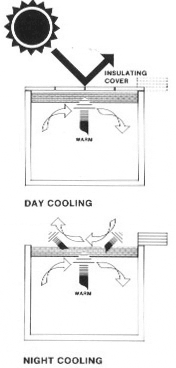 |
Figure 27. Roof bonds utilizing cool, clear nightskys can provide total cooling in many sections of the state. TOP - panels are kept closed during the day. BOTTOM - panels are opened after dusk to radiate out the absorbed day time interior heat. |
EVAPORATIVE COOLING METHODS
When water evaporates it absorbs a large amount of heat from its surroundings (about 1000 BTU per pound of water evaporated). The most familiar example of this is the cooling effect of evaporating perspiration on the human skin. In arid, hot climates body temperature is partially controlled by the rapid evaporation of perspiration from the surface of the skin. In hot climates with high atmospheric moisture the cooling effect is less because the high moisture content of the surrounding air. In both situations, however, the evaporation rate is raised as air movement is increased. Both of these facts can be applied to natural cooling of structures.
Evaporative methods can be used to enhance the cooling rates in convective cooling systems. One way of doing this is to bring the outdoor air into the house through a moist filter or pad as shown in Figure 28. The familiar evaporative cooler, precursor to the air conditioner, is a mechanical system which uses these principles with a motor to force air movement and distribution. Passive cooling strategies with earth tubes and/or cool towers use the same principles but utilize natural systems for air drivers and distribution. If underground intake pipes are made from a porous material, and ground above them is well cool and watered, some evaporation will occur at the inner surface of the pipe.
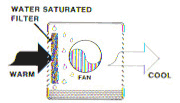 |
Figure 28. Swamp cooler - drier outside air is drawn through a moist pad. As moisture is picked up by the air heat is absorbed by the water, the result is cooler air. |
Cool towers utilize wet cooling pads, and the force of gravity. Heavier, cooled air "falls", via gravity, into the building and its momentum floods the habitable area. This cool tower action, as well as that of the earth cooling tubes, can be enhanced and distribution extended, by the placement of thermal chimney "drivers" which can pull the cooled air through the building with an increase in both air quantity and velocity. In either case, the cooler air now has a higher relative humidity, but this is not usually a problem and can even be a benefit in arid climates.
In some areas, there may be a time of higher humidity (desert monsoon season). While sensible heat continues to be mitigated by passive cooling techniques, the latent heat contained in the humid air is more difficult to dissipate, which renders evaporative cooling less effective. The integration of a air dehumidification system easily corrects this short term problematic condition.
Evaporative cooling strategies are well suited to those areas of the southwest with the most severe cooling requirements. In the desert areas of the South, the warm night air (80 degrees+) may impede natural convection heat dissipation from a roof pond cooling system. That is one of the reasons why the cooling rate falls to about 25 BTU/hr/ft^2 in the extreme southeast corner of the state (Fig. 29). Simple introduction of a thin water layer over the water containment surface can increase the overall cooling rate of the roof by 50-100 percent due to the resulting evaporation.
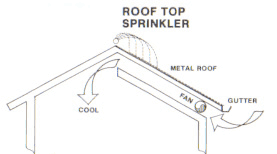
In the most severe climates where nighttime air temperatures often remain above 90°F in summer, sprays can be used to achieve maximum natural cooling, at standard roofs and roof cooling systems like the roof pond strategy. In the summer, sprays can be used to achieve optimum natural cooling. In the approach shown in Figure 30, water is pumped to sprinklers along the peak of a house and allowed to trickle down a sloping roof. The rate of evaporation is greatly enhanced in such a system because a much larger surface area is exposed to the night air. Roof sprays rely on a little external power to get the water to the roof and hence do not qualify as completely passive systems. But the total amount of energy consumed for pumping is very minimal compared to the energy saved by the added cooling rate attained. Excess water can be captured and reused or used elsewhere on the site.
|
|
| Figure 29. Roof top sprinkler - combined radiative and evaporative cooling can be integrated together to increase the rate of cooling |
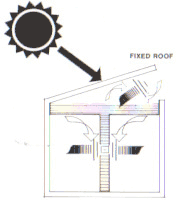
Figure 30. Open pond with water wall - combined systems can be devised to provide direct cooling. For all interior spaces. |
A passive evaporative system developed in California is shown in Fig. 31. An open pool of water located above the living spaces on the north side of a house is shaded from the summer sun but exposed to the cool north sky both day and night. Evaporation from the pool surface, aided by radiation and natural convection, keeps the water in this pool 30°F below the outside air temperature on a hot summer day, without the use of movable insulating panels. Natural convection brings this cool water into the house and draws heat back up to the pool as shown.
With all evaporative cooling methods, it is important to maximize airflow across the exposed water. Fresh air must be continually available to replace the humid air being built up near or over the water. Failing this, air will be quickly saturated with water vapor, and the evaporation and cooling rates will decline abruptly. Lips, edges and other structures or buildings that could block or deflect prevailing winds away from the water surfaces should be studiously avoided. Sometimes, a small fan to disturb the air over a pond will greatly aid the evaporation rate on a hot, sultry day or night.
Even with direct, active evaporative cooler systems, provision of interior thermal mass combined with direct evaporative cooling is a combination that works effectively. During the day, the structure can utilize the stored coolth in the walls and floors, and maintain an improved level of comfort while reducing power requirements of direct evaporative cooler system. In many areas of the southwest which are considered hot, arid zones, periods of higher humidity renders mechanical evaporative cooling unsatisfactory even when optimized techniques are used. A solution to this is the two-stage evaporative cooling system, which has been shown to be an effective alternative to direct evaporative cooling or refrigerated air-conditioning.
While not a passive system, two-stage evaporative cooling is an important element to be considered as part of passive cooling strategies. Cooling is accomplished by pre-cooling ambient air without humidification before further cooling by evaporation. The cool air entering the structure is then exhausted, typically through areas of heat gain such as windows or the attic. The pre-cooling may be accomplished by a combined cooling tower, heat exchanger unit, or by nocturnally cooled rock bed through which air is drawn. The second stage, evaporative cooling, is accomplished by a standard commercial evaporative cooling device, or by passive cooling elements of earth tubes or cool towers. Rock bed mechanical cooling has been used extensively in Australia with high degrees of effectiveness.
Two-stage evaporative system can also be combined with active and hybrid solar heating systems using the same storage (rock bed) system for both seasons. Working systems have been developed and demonstrated. This type of system is necessarily suited for new construction because of the requirement for the rock bed, which is most effectively located beneath the structure. It works well during hot, humid periods in the southwest using only slightly more power than direct evaporative cooling and the comfort attained is similar to that of refrigerated air-conditioning.
A typical system consisting of two evaporative coolers and a large rock bed is shown in Figure 31. At night, one evaporative cooler cools the rock bed while the other cools the house using a one-stage evaporative cooler. During the day, hot outside air is drawn through the night-cooled rock bed where it is pre-cooled before entering the main house evaporative cooler. Since no moisture has been deposited in the rock bed, the pre-cooled air has not had moisture introduced into the house. An attractive feature of this type of system is the combining of heating and cooling systems in order to make the best possible use of components during the entire year. An air heater may be used to provide hot air during the heating season to the rock bed where the rock bed, fans, ducts and many of the control systems are used both during the heating and cooling season.
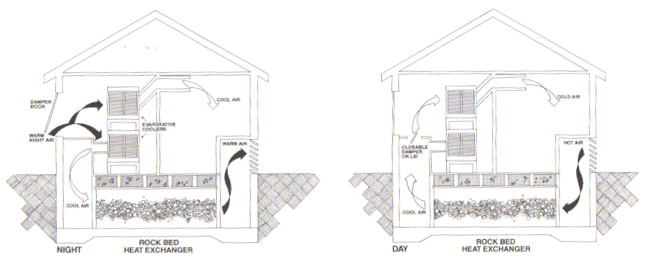
Figure 31. Schematic diagram of two stage evaporative cooling with rockbed.
Recuperative and regenerative evaporative cooling options are other methods to produce greater comfort using evaporative cooling. These techniques use the relatively cool air exhausted from the structure to improve the performance of the evaporative cooling device. Evaporatively cooled water reduces in temperature the ambient air in the heat exchanger without humidification as it enters the structure. The cool, dry air warms a few degrees as it passes through the structure and exits through the evaporative cooling device or a cooling structure. Since the exiting air is cool and dry, the wet bulb temperature is lower and the water produced by the evaporative cooling device is cooler than if ambient air were used. The rock bed heat exchanger and the evaporative cooling device could be combined into a single unit. If the rock bed is used to store heat in the winter, the cost effectiveness of the system is improved.
NOTE: The psychometric chart should be used at all times to analyze the effect of changing air conditions in these systems. As a rule of thumb, pre-cooling the air ten degrees will cause a three degree decrease in the output temperatures of an evaporative air cooler. The improper use of this rule can lead to errors of judgment when analyzing the results of changing conditions.
Because of the large volumes of air that are moved in an effective evaporative system, the ducts must be large and appropriately sized. Typically, evaporative cooler ducts are at least three times the cross-section area of ducts refrigeration; ducts should be laid out using the shortest route possible and a minimum of turns. Evaporative cooling has been shown to be an effective alternative to refrigerated air-conditioning throughout the desert regions of the southwest. The selection of the particular evaporative cooling techniques must be made carefully through analyzing the local climatic conditions. These cooling systems should be integrated into the design of the home and where possible, with the design of the solar heating system. By integrating these systems at the design stage, greater efficiencies and more attractive economics can be obtained.
Passive Solar Heating & Cooling Manual, Part 1 of 4 - Introduction to Solar Energy
Passive Solar Heating & Cooling Manual, Part 2 of 4 - Passive Solar Architecture - Heating
Passive Solar Heating & Cooling Manual, Part 4 of 4 - Glossary
Passive Solar Architecture - Heating
Passive Solar Heating presents the most cost effective means of providing heat to buildings. Generally, the amount of solar energy that falls on the roof of a house is more than the total energy consumed within the house. Passive solar applications, when included in initial building design, adds little or nothing to the cost of a building, yet has the effect of realizing a reduction in operational costs and reduced equipment demand. It is reliable, mechanically simple, and is a viable asset to a home. The following are rules of thumb and an explanation of the essentials of passive solar design.
The mechanism of heating and cooling equipment is usually referred to as a system. A building is designed (home, apartment house, etc.) and a heating/cooling system using forced air equipment with air ducts; radiant floors using hot water; etc., is specifically designed for it. In passive building designs the system is integrated into the building elements and materials - the windows, walls, floors, and roof are used as the heat collecting, storing, releasing, and distributing system. These very same elements are also a major element in passive cooling design but in a very different manner. It should be understood that passive solar design does not necessarily mean the elimination of standard mechanical systems, although recent designs coupled high efficiency back-up heating systems greatly reduce the size of the traditional heating systems and reduce the amount of non-renewable fuels needed to maintain comfortable indoor temperatures, even in the coldest climates.
The preceding explanations show that two elements must be present in all passive solar heating designs: a south facing exposure of transparent material (glass, plastic) to allow solar energy to enter; and a material to absorb and store the heat (or cool) for later use. With these two basic elements in mind a number of approaches to designing a passive solar heated structure are available. Passive cooling is discussed elsewhere in this tutorial.
PASSIVE SOLAR DESIGN (top)
The following section contains a brief description of basic passive solar design approaches. Subsequent sections contain more detailed information regarding each design and some advantages and limitations of each. Do not assume that because a particular design is more effective for a particular purpose (i.e. water walls respond more quickly in the absorption and release of heat) that it will serve in all climates and in all designs as the most effective approach to passive solar heating or cooling. Conversely, identified limitations do not mean that the approach is ineffective, only that it is more appropriate and effective under specific conditions. In choosing a particular design approach, site and climate conditions must be evaluated carefully so that the best approach or combination of approaches is incorporated. No one passive design approach is most advantageous in all climates or on all sites and situations. In the building design industry there are certain ways of doing things that have been developed over years of experience. These are sometimes called rules of thumb (RT). The same is true of passive solar building design. In the following sections, rules of thumb are identified for emphasis. Keep in mind that these are simply guidelines that will, if observed, produce favorable passive solar heating performance. In some cases tables that give detailed information based on climate and site variations supplement the rules of thumb.
DIRECT GAIN (top)
The simplest of approaches is a direct gain design. Sunlight is admitted to the space (by south facing glass) and virtually all of it is converted to thermal energy. The walls and floor are used for solar collection and thermal storage by intercepting radiation directly, and/or by absorbing reflected or reradiated energy (Fig. 4). As long as the room temperature remains high in the interior space storage mass (walls, floors) will conduct heat to their cores. At night, when outside temperatures drop and the interior space cools, the heat flow into the storage masses is reversed and heat is given up to the interior space in order to reach equilibrium. This re-radiation of collected daytime heat can maintain a comfortable temperature during cool/cold nights and can extend through several cloudy days without "recharging".
Direct gain design is simple in concept and can employ a wide variety of materials and combinations of ideas that will depend greatly upon the site and topography; building location and orientation; building shape (depth, length, and volume); and space use.
|

|
|

|
| Figure 4. Direct gain design - A direct gain design collects and stores heat during the day. At night stored heat is radiated into the living spaces. |
|
Figure 5. Direct gain interior - A direct gain design with an interior water wall for heat storage. Heat stored in the water wall is radiated into the living space at night. |
A direct gain design requires about one-half to two-thirds of the total interior surface area (RT) to be constructed of thermal storage materials. These can include floor, ceiling and wall elements, and the materials can range from masonry (concrete, adobe, brick, etc.) to water (Fig. 5). Water contained within plastic or metal containment and placed in the direct path of the sun's rays has the advantage of heating more quickly and more evenly than masonry walls during the convection process. The convection process also prevents surface temperatures from becoming too extreme as they sometimes do when dark colored masonry surfaces receive direct sunlight. The masonry heating problem can be alleviated by using a glazing material that scatters sunlight so that it is more evenly distributed over walls, ceiling, and floor storage masses (Fig. 6). This decreases the intensity of rays reaching any single surface but does not reduce the amount of solar energy entering the space.
 |
| Figure 6. Diffusing glazing materials. Translucent glazing scatters sunlight to all storage surfaces. |
INDIRECT GAIN (top)
This passive solar design approach uses the basic elements of collection and storage of heat in combination with the convection process. In this approach, thermal storage materials are placed between the interior habitable space and the sun so there is no direct heating. Instead a dark colored thermal storage wall is placed just behind a south facing glazing (windows). Sunlight enters through the glass and is immediately absorbed at the surface of the storage wall where it is either stored or eventually conducted through the material mass to the inside space. In most cases the masonry thermal storage mass cannot absorb solar energy as fast as it enters the space between the mass and the window area. Temperatures in this space can easily exceed 100°F. This build up of heat can be utilized to warm a space by providing heat-distributing vents the top of the wall (where the heated air, rising upward due to less density, can flow into the interior space (Fig. 7). Vents at the bottom of the wall allow cool air to be drawn into the heating space thereby replacing the outflowing hot air, and picking up heat itself. The top and bottom vents continue to circulate air as long as the air entering the bottom vent is cooler than the air leaving the top vent. This is known as a natural convective loop. At night the vents can be closed to keep cold air out and the interior space is then heated by the storage mass, which gives up its heat by radiation as the room cools. A variation of the vented masonry wall design is one that employs a water wall between the sun and the interior space (Fig. 8). Water walls used in this way need not be vented at top and bottom and can be constructed in many ways - even 55-gallon drums filled with water, or specially constructed plastic or sealed concrete containers. Again, as the water is heated, the convection process quickly distributes the heat throughout the mass and the interior space is warmed by heat radiated from the wall.

Figure 7. Indirect gain Trombe wall stores heat during the day. Excess heat is vented to the interior space. At night Trombe wall vents are closed and the storage wall radiates heat into the interior space.
|
|

Figure 8. Indirect gain water wall collects and stores heat during the day. Heat stored in indirect gain water wall is radiated into the living space at night.
|
|
Another design approach (Fig. 9) takes advantage of the greenhouse effect as well as the direct gain storage wall. A south facing "greenhouse space" is constructed in front of a thermal storage wall exposed to the direct rays of the sun. This wall would be at the rear of the greenhouse and the front of the primary structure. The thermal wall absorbs heat at the same time the interior space of the greenhouse is being heated. If a vented masonry wall is used as storage, heat can also be released into the living space by convection. This combination also works with an unvented water wall. The greenhouse, then, is heated by direct gain while the living space is heated by indirect gain (Fig. 10). The advantage is that a tempered greenhouse condition can be maintained through days of no sun, with heating from both sides of the thermal storage wall.
An indirect gain design which provides both heating and cooling is the thermal pond approach, which uses water encased in ultraviolet ray inhibiting plastic beds underlined with a dark color, that are placed on a roof. In warm and temperate climates with low precipitation, the flat roof structure also serves directly as a ceiling for the living spaces below (Fig. 11) thereby facilitating direct transfer of heating and cooling for the spaces below. In colder climes, where heating is more desirable, attic ponds under pitched roof glazing are effective. Winter heating occurs when sunlight heats the water, which then radiates energy into the living space as well as absorbs heat within the water thermal mass for nighttime distribution. During the summer, a reverse process, described later, occurs. For best effect, roof ponds must be insulated (movable) so that heat will not radiate and be lost to the outside. One of the major advantages of this approach is that it allows all rooms to have their own radiant energy source with little concern about the orientation of the structure or optimal building form.
 |
|
| Figure 11. Heating cycle - Roof pond collects and stores heat during the day. At night roof ponds are covered and stored heat is radiated into the space below. |
|
ISOLATED GAIN
Finally, the isolated gain design approach uses a fluid (liquid or air) to collect heat in a flat plate solar collector attached to the structure. Heat is transferred through ducts or pipes by natural convection to a storage area - comprised of a bin (for air) or a tank (for liquid), where the collected cooler air or water is displaced and forced back to the collector (Fig. 12).
 |
|
| Figure 12. Water or air convection loop. |
|
If air is used as the transfer medium in a convection loop, heated air coming from the collector is usually directed into a rock (or other masonry mass material) bin where heat is absorbed by the rocks from the air. As the air passes its heat to the rocks it cools, falls to the bottom of the bin and is returned to the collector completing the cycle. At night the interior space of the structure is heated by convection of the collected radiant energy from the rock bin. If water is the transfer medium, the process works in much the same way except that heat is stored in a tank, and as hot water is introduced, cooler water is circulated to the collector. In naturally occurring convection systems (non-mechanically assisted) collectors must be lower than storage units, which must be lower than the spaces to be heated (RT). Of course, the addition of distribution assisting equipment can allow for placement of system elements anywhere, but that would then be an Active Solar System.
*PASSIVE SOLAR HEATING DESIGN CONSIDERATIONS:
SITE CONSIDERATIONS (top)
The performance of any solar energy building, especially one of a passive design, is strongly impacted by the site and the siting of the building in relation to its surroundings. During the winter, the north side of a building receives little direct solar impact due to shading from the winter sun, which is low in the sky, while the south side is exposed to the benefits of winter sun exposure. If site conditions are restricted, the passive solar heated building location will be the area that receives the most sunlight between the hours of 9:00 a.m. and 3:00 p.m. during the winter months. The building location should be near at northern extremity of the sunny area so that future development on properties to the south will not block access to winter sunlight. This location also allows open space for winter activities or gardens to be exposed to as much winter sun as possible.
BUILDING SHAPE AND ORIENTATION (top)
Generally, buildings oriented along an east-west axis are more efficient for both winter heating and summer cooling (RT). This orientation allows for maximum solar glazing (windows) to the south for solar capture for heating. This orientation is also advantageous for summer cooling conditions since it minimizes east-west exposure to morning and afternoon summer sunlight. This does not mean that all buildings must be rigidly shaped oriented. Different building shapes and orientations can be designed to perform efficiently by combining effective glazing, solar exposure, and shading into the building form. This efficiency can be enhanced by variations in the placement of interior spaces and by the use of such options as clerestories and skylights. Depending upon the site, topography, and shape of the available space, orientations other than east and west may be desirable. However, for most climates, an east-west axis is the most efficient for both heating and cooling.
NORTH WALLS (top)
In an east-west oriented building, a north facing exterior wall will receive little sunlight during the winter and this will be a major source of heat loss since heat always moves toward cold. Additionally, building shading of north side open space usually renders it unusable for outdoor use. To alleviate these situations the building should be shaped so that the roof slopes downward from the south to the north wall. This reduces the height of the north face of the building and therefore the area through which heat is lost. This also allows sunlight to reach more area of north side outdoor spaces. Variations of reducing heat loss conditions manifest in north walls include backing the building into a sloped hillside or providing a berm, both of which reduce the exposed north area. Both of these measures accomplish the purpose of a south to north downward sloping wall (Fig. 13).
 |
| Figure 13. South to north downward sloping roof reduces heat loss from the north wall and allows sunlight to reach north side open space. |
INDOOR SPACE PLANNING (top)
With location, orientation and shape of the building is the consideration of interior space distribution. Habitable spaces that are most occupied and have the greatest heating and lighting requirement should be arrayed along the south face of the building. Rooms that are least used (closets, storage areas, garages) should be placed along the north wall where they can act as a buffer between high use living space and the cold north side (Fig. 14).
 |
| Figure 14. Interior space should be arranged so that rooms with high heating and lighting requirements are arrayed along the south wall. |
ENTRYWAYS (top)
Entries account for great deal of heat loss especially in small structures. Heat is lost during opening and closing of doors (or windows). Heat can also be lost by seeping between the doorframe and the door, and at windows. This kind of window, door or other wall penetration heat loss (or heat gain in the summer) is called infiltration. To reduce both direct and infiltration losses, entryways should be recessed or protected against the direct force of prevailing winds. Additional loss reduction can be accomplished by providing an enclosed interior "air lock" space between an entrance door and the main building. This double entry, or vestibule, creates a tempered zone between the outside elements and the interior living space thereby reducing the amount of warm air lost (and summer heat gained). It also reduces the amount of cold or warm air entering the living space when the interior door is opened.
WINDOWS (top)
The major expanse of windows in a passive solar energy structure will be south facing solar windows. Whole design planning should include considerations re: the impact of heat gain in the summer; views; natural lighting; and privacy requirements in determining the placement and size of windows in the structure.
For the most part, window areas on east, west and north facing walls should be kept as small and as minimal as is consistent with interior requirements and should be recessed and all should be double-glazed. Windows are the least effective heat flow inhibitors of a building's shell, both in terms of letting heat out in the winter, and letting heat in the summer. When the outside temperature is 30°F and the inside temperature is 68°F, a square foot of single pane glass will lose 20 times as much heat (about 43 BTU's per hour) as a square foot of standard wood frame wall with 3'/z inches of insulation.
DIRECT GAIN DESIGN (top)
SOLAR WINDOWS (top)
For Direct Gain heating the area of the glazed collecting surface is determined in response to the duration and severity of winter temperatures; the building size; and the amount of interior thermal storage mass. A correct balance between these factors must be found in order to avoid large daily temperature fluctuations that could result in overheating, even in the winter. As a rule (assuming the correct amount of thermal storage mass), 0.19 to 0.38 square feet of south facing glass for each square foot of interior floor area will provide enough sunlight to maintain an average temperature between 65°F and 70°F during the winter months in cold climates (average winter temperatures between 20°F and 30°F). In more moderate climes the same temperatures can be achieved with 0.11 to 0.25 square feet of south facing glass (average winter temperatures between 35°F and 40°F). More precise data is given in Table 3. Location and sizing of glazing is also dependent upon the building layout and types of spaces i.e., frequently used spaces vs. infrequently used spaces. Adjustments in glazing size and location of solar windows can occur by the use of reflectors, or when other passive solar design elements are used in combination with a direct gain system such as heat loss reduction by the use of movable insulation, double glazing, and by using wooden sash and frames. The lower heat conductivity of wood can reduce the heat loss around windows by as much as 20 percent.
CLERESTORIES AND SKYLIGHTS (top)
Earlier it was mentioned that there may be considerations that override the need for a large expanse of south facing windows in passive heating designs. One is that interior room layout may affect the distance between the collecting windows and the interior thermal storage mass wall. Thermal storage masses in direct gain designs must receive direct sunlight impact, and the farther away from the collecting surface they are, the taller the collecting surface (glazing) must be in order to have sufficient surface solar contact because of the sun's angle. This situation may produce intolerable glare and overheating. Usually, storage walls should not be set back more than 1.25 to 1.5 times the height of the collecting surface - i.e. an interior thermal storage wall should be no more than 12' from the 8' tall solar collecting glazing wall. Also, direct sunlight may impact materials - i.e. dry out wood furniture; discolor certain fabrics; etc. so care should be taken re: interior decorating and maintenance. Finally, and most important, adjacent structures and/or vegetation may reduce the amount of direct sunlight to the point that a south facing collecting surface at ground level becomes infeasible or seriously reduced.
Any one, or combination of these conditions make south wall heat collection for direct gain problematic, but can be easily mitigated by the use of clerestories or skylights. Both of these features admit sunlight at the roof structure of a building and can be used to direct sunlight to a specific interior surface. They can also be used in combination with or as a supplement to a south facing glazed wall. Additionally, they provide for natural light applications, which can reduce the need and cost of artificial lighting.
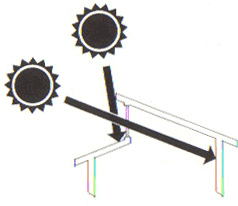
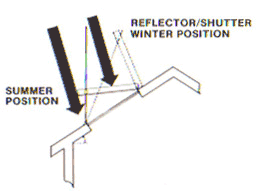
Clerestories are vertical south facing windows located at roof level (Fig. 15). Their advantages are that they allow diffuse lighting into a room; they provide privacy; and they can be placed almost anywhere on a roof. In a compartmentalized building layout, each room can have its own source of heat and light. They should be located at a distance from a thermal storage wall that allows direct sunlight to hit the wall throughout the winter. This distance is roughly 1.5 times the height of the wall. Ceilings in rooms containing clerestories should be light in color to reflect or diffuse sunlight into the living space. Large interior spaces may have multiple clerestories arranged to allow maximum admission of sunlight. Care must be taken that they do not shade each other, so the clerestorey roof angle (from horizontal) of each clerestorey should be roughly the same angle of the sun at its lowest winter point (noon on December 21). Skylights are simply openings in a roof, which admit sunlight -they are either horizontal (a flat roof) or pitched at the same angle as the roof slope. In most cases. horizontal skylights are used with reflectors to increase the intensity of solar radiation (remember the angle of incidence). Large skylights should be provided with shading devices to prevent heat loss at night and heat gain during the summer months (Fig. 16).
|
|
 |
|
| Figure 15. Clerestory - clerestories can be used to provide sunshine onto interior walls which would normally not have a clear view of winter sunlight. |
|
Figure 16. Skylights provide an alternative for direct solar gain, shading devices must be included as an integral part of the skylight to prevent overheating the space during mild periods. |
STORING HEAT – MASONRY (top)
The major concern in designing a direct gain passive solar structure to avoid uncomfortable temperature fluctuations over the day-night cycle. It is relatively easy to calculate the amount of heat that will be admitted to a room by any particular collecting surface. It is not, however, easy to predict the percent of that heat which will be stored. Since the difference between heat gained and heat stored will largely determine the temperature fluctuation over a 24-hour period, this is one of the most important design considerations. About 65 percent of all heat gained through solar windows during a clear winter day can be lost during the night. This means that during the day, 65 percent of the heat gained must be stored to offset nighttime losses, and to maintain a relatively even temperature profile. Furthermore, efficient storage during the day prevents the build-up of heat during daylight hours.
In general terms, the following rules should be observed in regard to design of heat storage systems:
* masonry and concrete floors, walls and ceilings to be used for heat storage should be a minimum of 4 inches thick.
* sunlight should be distributed over as much of the storage mass surface as possible by using translucent glazing. * a number of small windows to admit sunlight in patches gives better control re: overheating.
* use light colored surfaces (non-thermal mass storage walls, ceilings, floors) to reflect sunlight to thermal storage mass elements.
* thermal storage mass elements (floors, walls, ceilings) should b dark in color.
* masonry floors used for thermal mass should not be covered with wall-to-wall carpeting.
* direct sunlight should not hit dark colored masonry for long periods of time.
Storing heat can be accomplished in many ways but the most favorable storage occurs when each square foot of sunlight is spread (diffused) over a nine square foot area of storage surface. With this distribution of sunlight the storage mass need not be more than 4 inches thick. If sunlight is distributed over less area, storage efficiency can be increased somewhat by increasing the thickness of the storage mass- up to eight inches in thickness. Increasing thickness beyond 8 inches has no beneficial effect on heat storage efficiency. Therefore, the most efficient way to increase heat storage capacity is to increase the storage surface area and the distribution of sunlight rather than the thickness of the storage mass. This is because masonry absorbs heat slowly, and intense sunlight on a small area will have a negative affect by increasing room temperature while not significantly increasing the rate heat is absorbed by the storage mass, while a system using dispersed, less intense radiation across a larger surface of thermal mass storage will moderate room temperature fluctuations and store most heat at the same time.
The heat retention efficiency of masonry storage masses is also influenced by the kind of masonry used. Table 4 shows that magnesium brick has twice the conductivity of the other materials listed. Higher conductivity means that a material responds more quickly in both absorbing and giving up heat - a quality that increases storage efficiency and decreases temperature fluctuations.
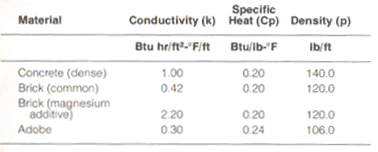
Table 4. Thermal storage material properties.
INTERIOR WATER WALLS (top)
Because of the material's good convective properties, interior walls of water (water walls) are much more efficient for thermal collection, storage, and re-radiation than are masonry walls. Water walls should be a dark color to increase heat absorption when exposed to direct sunlight, and will perform well without the problem of heat build-up in the room. The convection process carries heat away from the storage surface quickly, preventing heat build-up, and allows the storage mass to heat evenly in a relatively short time. Widely fluctuating interior temperatures are not often a problem when interior water walls are used for heat storage.
If interior water walls receive direct sunlight between the hours of 10:00 a.m. and 2:00 p.m. and are a dark color, about one cubic foot of water is required for each square foot of solar window to maintain comfortable temperatures during winter months. Increasing the volume of water in this ratio to 3 cubic fed of water will decrease daily temperature fluctuations by as much as 6°F.
INDIRECT GAIN DESIGN: (top)
Properly sized, indirect gain thermal storage elements, usually walls, can provide a high percentage of the heat required to keep a space at comfortable temperatures, even in very cold climates. Thermal storage walls, like interior storage walls, can be constructed of either masonry or water. For masonry walls, between 0.43 and 1.0 square feet of south facing double glazed solar window is needed for each square foot of floor area in climates with average winter temperatures between 20°F and 30°F A smaller area can be used (0.31-0.85) if water is the storage medium. In climates where the average winter temperature is 35-F to 45°F, the figures are 0.22 to 0.6 for masonry walls and 0.16 to 0.43 for water walls. Table 5 gives more precise information.
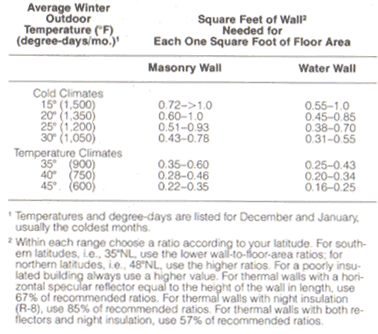
Table 5. Sizing a thermal storage wall for different climatic conditions.
THERMAL STORAGE WALL SIZE (top)
Correct wall size varies with local conditions and climate; the amount of insulation used; and the latitude of the building site. The first two elements affect the rate of temperature loss from a space, which is influenced by the amount of difference between outside and inside temperatures; and how much insulation is used to slow that rate. Latitude is important because it affects the amount of solar radiation received at the collecting surface on any particular day. For instance, on a clear January day in Tulsa, Oklahoma, a square foot of collecting surface will intercept 1883 BTU's while on the same day, a like amount of surface located in Seattle will intercept only 1537 BTU's (assuming the same slope for both surfaces). Local conditions aside, it is generally true that wall size will need to be increased as one moves further north in latitude.
Other conditions that bear on wall size include obstructions to solar radiation exposure, such as trees, structures, etc.. While unhampered solar access will determine an optimal wall size, reduced or variable access to the sun will require a larger wall area to compensate for reduced solar impact. Sizing guidelines identified herein are based on providing enough heat on a clear January day to maintain an average space temperature of 65 to 75°F over a 24-hour period. Since thermal storage walls are placed between the solar collecting glazing and the interior space to be heated, overheating is less problematic than with a direct gain design. Very cold climates, or where site conditions allow less than recommended wall size, can benefit from the use of reflectors, which bounce the sun's rays to the collection window, thereby increasing the amount of solar radiation moving through the glazing and intercepted by the energy absorber wall. Thermal wall size reduction can occur by as much as 15% if substantial insulation is used at all other wall and roof locations to reduce heat loss from the the building.
WALL DETAILS (top)
Aside from the wall area and amount of exposure, the thickness, type of material, and exposed surface color of a wall are main considerations that determine the effectiveness of a wall in meeting the thermal needs of the structure's occupants. In general, cold climate design benefits from dark, exterior surface colors at the thermal storage wall.
A variation of the cold climate, indirect gain masonry wall, which relies on absorption of solar energy at its face and radiation of converted heat at its back, is the addition of vents at upper and lower wall locations to provide convected heat to the interior space. Thermal storage wall vents take advantage of the excessive heat build up between the glazing and the surface of the storage wall (Table 7) which can easily exceed 100°F. Venting the top and bottom of the wall of the living space allows trapped heated air to move, rising (hot air is lighter than cold air) from the space between the glazing and wall and flowing into the building interior through upper vents. As warm air moves through the vents, cooler room air is drawn through the lower vents, where it is warmed and rises to repeat the action. This convective cycle directly warms the interior space at the same time heat is being absorbed by the thermal mass of the wall, which will give up its heat to the interior at a later time. This dual action is a benefit for direct heating as well as delayed heating.

Table 6. Material and recommended thickness.

Table 7. Effect of wall thickness on space air temperature fluctuations.
Convection can continue 2 to 3 hours after sunset due to the heated exterior surface of the thermal storage wall, so it is important that upper vents are closed when the exterior surface begins to cool. This action prevents a reverse convection cycle, which removes heat from the space. Interior space heating quality can be controlled by providing a movable reflective screen across part or all of the exterior surface of the thermal wall. Vent sizing is about two square feet for each 100 square feet of thermal wall wall surface, equally distributed between top and bottom vents (Fig. 17).
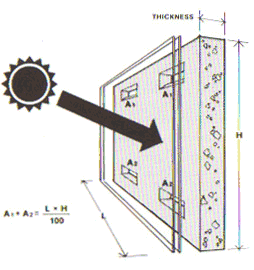
Figure 17. Masonry wall - Vent placement and sizing
in mass wall should be as shown in the illustration.
Appropriate wall thickness varies with the material used (Table 6). Again, the idea is to provide comfortable conditions while avoiding large and rapid temperature fluctuations. Table 7 gives an idea of the range of temperature fluctuations for six different wall thicknesses constructed of five different materials. Regardless of the material used, it can be expected that while thick walls will produce both minimum and maximum temperatures at different times of day than thin walls, due to the additional time it takes heat to be conducted, their increased capacity for assimilating and radiating heat will be much greater .
Water walls are slightly more efficient than masonry walls in collection, retention and re-radiation of heat. They require different design consideration i.e. containing the water in an effective, inexpensive and esthetically pleasing way. There are a variety of water encasing systems ranging from manufactured, elegant free standing cylinders and containers to do-it-yourself systems of used, stacked drums, free-standing plastic cylinders, and site-built tanks.
ATTACHED GREENHOUSES (top)
An indirect gain heating system, using a green house structure as a heat collector, is multi-purpose, practical and efficient. It also requires the most rigorous design because of its multiple nature, which affects sizing for space heating, creating ideal conditions for greenhouse conditions, and accurately predicting performance for both. The attachment of a greenhouse to the south side of a building enables the structure to benefit from the normal, heat collecting greenhouse operation. The greenhouse collects heat due to its solar exposure. This heat can be conducted through a thermal storage wall separating house and greenhouse, or can be convected to the interior space of the building. In this way the greenhouse serves both as a heat collector, and a solarium for people and plants. Generally, in cold climates, a greenhouse design would use between 0.65 and 1.5 square feet of south facing double glass greenhouse collecting surface for each square foot of floor area in the adjacent living space. In more moderate climates this can be reduced to 0.33 and 0.9 square feet. This should provide enough heat to keep the average temperature in the adjacent space between 60°F and 70°F. More data are given in Table 8.
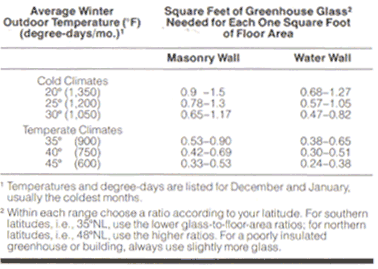
Table 8. Sizing the attached greenhouse for different climatic conditions.
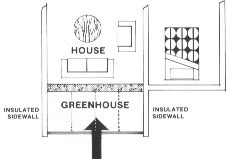
It is desirable for a solar greenhouse structure to be recessed into the south facade of the building, thereby minimizing east and west exposures, which have little effect on heat collection but can be a great source of heat loss. Furthermore, heat transfer through the common wall between the greenhouse and the living space is increased in this configuration (Fig. 18). Greenhouses for heating purposes can be added to frame buildings to provide for direct heat during winter days, but such buildings, without thermal storage mass, do not have the ability nor capacity to store heat for use at night. Some designs integrating greenhouses, adjust for nighttime heating by transfer of all greenhouse heat to main building storage mass (floors, walls, etc.) for deferred use at night. This only works in moderately cold climates, because very cold climates require the residual heat collected by the greenhouse to keep it, and its contents, from freezing at night.
The common wall between the greenhouse and the building interior can be constructed of thermal mass materials (masonry, water, etc.). The greenhouse side of common walls should be dark in color (better absorber) and should receive maximum sunlight throughout the day. Wall vents and/or operable windows can be used to allow heated air directly into the interior space during the daytime.
Wall thickness should be same as that provided for in an indirect gain (Trombe) wall. If water is used, its minimum thickness should be 8 inches (or 0.67 cubic feet for each square foot of south-facing glass).
Masonry walls cannot absorb and transfer heat as fast as a greenhouse can collect it. As a result, temperatures in the greenhouse will fluctuate as much as 60°F on a clear day. To dampen (level out) these fluctuations, extra storage mass (such as masonry units or containers filled with water) can be placed in the greenhouse. These act as an interior heat dampening water wall (1 cubic foot of water for each square foot of south facing glass will reduce temperature fluctuations 25°F to 29°F).
If water is used as the common wall between the greenhouse and the living space, temperature fluctuations will be smaller, and if more than the 0.67 cubic feet of water for each square foot of glass is used in the wall, temperature fluctuations will be further reduced.
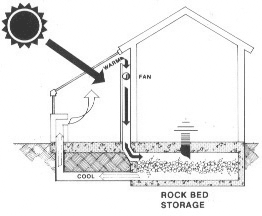
In cold climates, it may be advantageous to utilize a heat storage, in the form of a rock bin, under the building or living space, which would act as thermal storage of heat collected during the day. Heat transfer can occur by natural convection if the building is terraced up a slope, or by use of a fan, which would transfer heat to a rock bed located in a crawl space under the floor of the structure (Fig. 19). The rock bed should spread across 75 to 100% of the floor area of the structure in cold climates, and 50 to 75% of the floor area in moderate climates. Heat from the greenhouse should be directed over the rock bed and a means of returning cold air from the bottom of the rock bed to the greenhouse should be provided. If a terraced design is used, colder air will naturally settle due to the convective loop cycle. About 1.5 to 3 cubic feet of fist-sized rock is necessary in cold climates and .5 to 1 cubic feet in temperate climates. Rock bin storage has also been used as a part of a cooling system in warmer climes.
 |
|
 |
| Figure 18. By extending the end walls of an attached greenhouse, loss to the outside is reduced while the heat gains to the space are incresed. |
|
Figure 19. Small fans (less than 0.25 H.P.) can be used to aid in the transfer of heat from collection space to more remote parts of the structure. |
ROOF PONDS (top)
Roof ponds can be used both for heating during the winter months and for cooling during the summer months. In this section only the heating aspects of roof ponds will be discussed. Table 9 gives the ratios of roof pond collecting surface for each square foot of floor area in the interior space. It should be understood that this will vary depending on location, exposure and local conditions. The lower ratio given in the table should be adequate at lower latitudes while the higher ratio should be used at higher latitudes (colder climates). For latitudes higher that 36° north, roof ponds require greater solar gain exposure as well as greater protection from loss of gained heat.
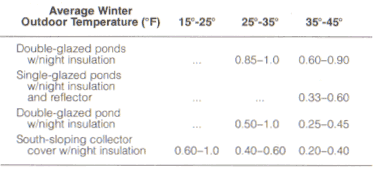
Table 9.
The system is simple in concept. The roof pond approach brings the differing building aspects of a building - roof, ceiling, heating (and cooling) system, and heat distribution (does away with ducts) into one system. The roof ponds of contained water are the heating (and cooling) unit. The roof/ceilings of the building act as the structural support for the roof ponds; the "radiator" device for evenly distributed heating of the spaces below; and as a waterproof roof system providing protection from the elements. The movable insulation above the ponds is the weather protection, heating/cooling system "manager" and additional protection from the elements. Wintertime heating is comprised of daytime opening the insulating roof layer to allow solar radiation to heat the water beds; water bed warming heats the supporting structure which is also the ceiling for spaces below; heated support structure radiates heat to the space. At night the insulated roof panels close to contain heat gathered by the ponds to continue heating the spaces below. Cooling strategies, discussed later, are the opposite operation plus additional elements.
The sun in northern latitudes is at a lower angle with solar radiation traveling through a greater mass of atmosphere, which reduces its energy content by scattering and reflection. In this situation, increased area of exposure or use of solar reflection can be used to increase roof pond effectiveness. Additionally, in colder climates, the roof pond system benefits from insulating covers to prevent nighttime losses. The most beneficial insulation system is one that is multi-purpose and movable, operating only twice a day to 1) expose the ponds for heat collection, and 2) to cover the ponds to prevent heat loss at night. This insulation system is also beneficial in the summer when the roof ponds must be insulated to prevent summer heat gain. The movable insulation structure can operate in a number of ways - rolling, hinged, etc.. In climates where snow is likely, ponds can be placed in a solar attic below the sloping roof with south facing glazing to allow solar gain, and the attic ceiling can be painted o a reflective color or sheathed with a reflective material. To increase system performance, glazing for cold climate solar ponds can be dual pane, or the ponds can contain an upper layer inflated air cell.
Ceiling structural support for solar ponds (64#/cu. ft.) include structural metal decking (excellent for thermal transfer to spaces below) or thin reinforced concrete decks (more costly, less effective for direct transfer of heat).
In constructing the support structure for roof ponds, the clear span can be as much as 16 - 20 feet or more (for metal decking or reinforced concrete), requiring intermediate structural beams and supports depending on the layout of the interior space and the weight of the ponds and insulating devices. This can be a complicated matter and it is recommended that assistance be sought from a structural engineer prior to design.
It is important to provide a waterproof layer (membrane, etc.) at the pond support system surface to provide protections during draining of water for maintenance, and from water bed material failure and/or weather impacts. The capability to drain the ponds in an easy and non-damaging manner is important. The water should be enclosed in ultra-violet light inhibiting (prevents degradation) plastic bags, waterproof structural metal or fiberglass tanks which form the ceiling below. The top of the water containment system must be transparent and the sides/bottom a dark color. Insulation panels should be constructed so that they can be tightly sealed when closed to prevent infiltration heat loss. In some applications insulating panels can also serve as reflectors when open in order to direct more solar to the ponds.
Heat is transferred from the roof ponds through the support deck to the interior space below. The edges of the deck should be carefully insulated to reduce heat loss. The underside of the support deck serves as an interior ceiling, and all surfaces (including galvanized metal decking) should be painted. Because the system provides a "radiant" ceiling it is important that no insulation is used between the root pond and the interior space. The one exception to this rule is at the bathroom, which generates high humidity from showers and tubs. Here, an uninsulated ceiling can result in condensation and drippage, so effective water barriers and insulation are critical.
Thermal ponds are typically water filled (6 to 12 inches deep) clear, ultraviolet inhibiting plastic bags. Care should be taken to choose materials which do not degrade when exposed to sunlight and water, nor are easily damaged from handing and local conditions. Temperature stratification in the ponds is avoided by using a clear top and dark bottom. With this configuration, sunlight will penetrate the water, be absorbed at the black surface and heat from the bottom will cause a continual convection cycle effect in the pond.
Finally, exposed pond tops should be sloped to drain. This avoids heat loss caused by evaporative cooling of the ponds during. While not a problem for waterbed "bags", this is a problem for more fixed types of installations. (see Haggard, K., et al., "Research Evaluation of a System of Natural Air Conditions." National Technical Information Service, Springfield, VA 22161, Order Number PB-243498).
Insulating panels can take many forms and configurations depending on local conditions and design (flat roof with exposed ponds in temperate and desert settings; pitched roof with glazing in snow country), and range from pivoting panels to horizontal, sliding panels constructed from standard metal building construction systems - insulation of polyurethane foam reinforced with fiberglass strands between aluminum skins placed within standard or easily formed metal frames. Panel tracks and supports must be designed so that the panel system (insulation and frames) fit as tightly as possible when closed in order to prevent compromise of the systems effectiveness. Without an effective seal system a great deal of heat stored can be lost at night due to infiltration.
COMBINING SYSTEMS (top)
Many times it is desirable, or even necessary, to use more than one passive heating design strategy. For instance, the use of a thermal storage wall may block a beautiful view while a direct gain design in the same south wall may create intolerable glare and have a tendency to overheat. In such cases the two designs can be used side by side or in any other configuration (a thermal storage wall on each side of a direct gain window). It is essential, however, to properly size this combination in order to maintain quality control and avoid undesirable temperature fluctuations. About 60 to 75% of the energy striking the collecting surface of a direct gain window can be used in space heating. On the other hand, only about 30 to 45% of the energy striking the collecting surface of a thermal storage wall is transferred to the interior space as heat. It can be seen that the approximate ratio in sizing this combination would be one square foot of direct gain window equals two square feet of thermal storage collecting surface. With these approximations in mind, it should be a relatively easy matter to size various combinations of passive solar designs.
Variation of roof pond designs make it impossible to present a simple rule of thumb for integrating with other design approaches. However, by reviewing the sizing techniques for the other systems and by knowing the specific design of the roof pond system, an approximate ratio can be calculated.
CLOUDY DAY STORAGE
Even on cloudy days passive solar heating designs continue to collect energy from diffused sunlight. However, this greatly reduced and diffuse solar radiation usually does not provide enough energy to keep interior temperatures at 70°F. Well designed thermal mass systems are sized to have carryover capacity and when combined with some auxiliary heating systems, provide for a comfortable environment for a number of cloudy days.
As a rule, direct gain systems can provide comfortable conditions for 1-2 cloudy days if the collecting area is increased by 10-20%, and the interior walls and floors are of solid masonry more than 8 inches thick. If water walls are used in place of masonry, increase the amount of water to two or three cubic feet for each square foot of south facing collecting area.
In climates where a number of consecutive sunny winter days are common there is a concern for overheating. For example, average temperatures with the above sizing may result in average interior temperatures of 74°F. However, on cloudy days, if the interior temperature drops an average of four degrees per day, comfortable conditions can be maintained for two days with no additional heating needed.
Oversizing in very cloudy or foggy climates is not recommended since thicker masonry takes a few days of sunshine to become fully charged. In climates such as these, overly thick storage masses are likely to result in under-heating problems. Glazed areas with minimum mass thickness should be used so that the system can respond quickly when sun is available.
Indirect gain systems differ slightly when designing for one or two cloudy days' storage. The collector area should be increased by 10 to 20%, and thermal storage walls of greater conductivity be used. If water walls are used, one or more cubic feet of water should be used for each square foot of collector area.
In indirect designs, if standard masonry wall material is used for cloudy day storage., the surface area of the wall should be increased instead of increasing masonry wall thickness. This may increase average daily temperatures, but overheating is easily mitigated by use of insulating panels or curtains drawn across the interior of the wall to provide temperature control. Built in ventilation systems can be used to control overheating for both indirect gain and direct gain systems.
MOVABLE INSULATION
In all structures, the greatest amount of heat gain is lost through glazing, either by conduction through the glass or by infiltration around the window frame. All heat loss during the winter reduces the efficiency of all heating systems including passive solar design, and where possible, movable, tightly sealed insulation should be used to cut losses to a minimum. The extent of heat loss under varying conditions of protection is given in Table 10.

Table 10. Conduction losses through single and double glazing with and without shutters for Boston1.
The use of movable insulation can simply involve manually operated panels that slide on a track across the glazed area, or be motor driven and temperature activated (more expense but more consistent control). Mechanical systems can be used to operate insulation difficult to reach manually. If the building is unattended when insulation should be moved, automatic timers connected to thermostats and/or light sensitive devices can operate, providing appropriate operation of the system. Some machinations can include automatically operated louvers, motor driven panels (roof ponds, etc.) and movable insulation. Whatever the method used, an effective insulation system will greatly increase the efficiency of passive solar designs.
REFLECTORS FOR PASSIVE SOLAR HEATING (top)
If partial shading is problematic, collection of solar radiation can be greatly enhanced by the use of reflecting devices. Generally, horizontal reflector equal in width and one to two times the height of the glazed opening in. length should be used for vertical (wall) glazing. South sloping skylights, benefit from reflectors located above the skylight at a tilt angle of roughly 100° from the slope of the roof (Fig. 20). The reflector should be roughly equal to the length and width of the skylight. Solar collection can be increased 30-40% when reflectors are used with either vertical, horizontal, or sloping glazing. For greatest efficiency, the angle of a reflector in relation to the collecting surface must be carefully selected. Table 11 gives the proper reflector angle for skylights with varying degrees of slope.
In some instances, reflecting surfaces can be used to direct sunlight to an interior storage surface such as a water wall. Reflectors should also be constructed so that they can be used to block heat gain in the summer. Table 12 gives the reflecting properties of some surfacing materials.
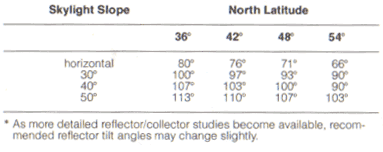
Table 11. Reflecting tilt-angles for south-facing skylights.
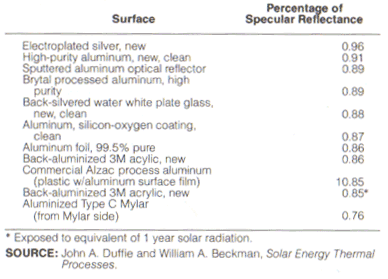
Table 12. Normal specular solar reflectance of various surfaces.
SHADING (top)
South facing glass can be a source of overheating during summer months. The potential for overheating can be controlled by a roof overhang carefully designed to shade the glass during the summer (sun higher in the sky) but not block sunlight during the winter (lower in the sky), and by the use of movable outside shading devices.
Overhangs should be equal in length to roughly one fourth the height of the window opening in southern latitudes (36° NL) and one-half the height of the opening in northern latitudes (48° NL).
The projection of the overhang that will be adequate (provide 100% shading at noon on June 21) at particular latitudes can be quickly calculated by using the following formula:
Projection = window opening (height)/ F (see Table 13)
A slightly longer overhang may be desirable at latitudes where this formula does not provide enough shade during August.
The usefulness of overhangs can be increased if they are constructed so that they are adjustable. Adjustable overhangs can be rolled back to admit sunlight on cold spring days. Trellised overhangs that support deciduous vines (vines that lose their leaves in the winter) are another way to block sunlight in the summer and admit sunlight in early spring. Retractable awnings and adjustable louvers can also be useful shading devices.
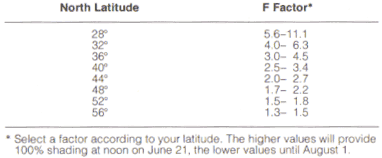
Table 13.
OUTSIDE INSOLATION (OUT-SULATION) (top)
Masonry wall exterior surfaces can lose large amounts of heat. For example - to achieve an insulation quality equal to 3.5 inches of fiberglass insulation, a concrete wall would have to be 12 feet thick. To avoid masonry wall heat loss to the exterior, it can be insulated on the outside. This "thermos bottle approach" includes the walls and the perimeter of foundation walls. Typical application is the addition of 1 to 2 feet of two-inch rigid waterproof insulation placed below grade to prevent stored heat in floors and walls from being lost to the outside.
In sunny temperate winter climates south facing, dark colored masonry walls need not be insulated as heat gained during sunny days will offset nighttime heat loss.
Next Part: Passive Solar Heating & Cooling Manual, Part 3 of 4 - Natural Cooling
| NOTE: Booklet available in Microsoft Word format, RTF format and PDF. Published by Rodale Press, Inc., 1980. A project of Western SUN Arizona and Western Solar Utilization Network. |
Introduction to Solar Energy
The sun's energy arrives on earth in the primary form of heat and light. Other aspects of solar radiation are less easily perceived and their detection often requires sophisticated equipment. All solar radiation travels through space in waves, and it is the length of these waves (the shortest is less than a millionth of an inch, the longest more than a thousand yards) by which all solar radiation is classified. The aggregate of all radiation aspects of the sun is called the solar spectrum.
There are two important facets about the solar spectrum.
1. While the sun emits radiation in all wavelengths, it is the short wavelength radiation that accounts for the majority of energy in the solar spectrum. For example, the portion of the spectrum perceived as the visible light is a relatively small segment compared to the variety of spectrum wavelengths, yet accounts for 46 percent of the energy radiating from the sun. Another 49 percent, that which is perceived as heat, is derived from the infrared band of the spectrum.
2. The proportion of different wavelengths in the solar spectrum does not change and therefore the energy output of the sun remains constant. A measurement of this phenomena is known as the Solar Constant, defined as the amount of heat energy delivered by solar radiation to a square foot of material set perpendicular to the sun’s rays for one hour at the outer edge of the earth’s atmosphere. The Solar Constant measurement is about 429.2 BTU’s with minimal changes over the year. The energy measured as the Solar Constant is not a measure of the amount of solar energy that actually reaches the earth’s surface, since as much as 35 percent of all the solar radiation intercepted by the earth and its surrounding atmosphere is reflected back into space. Additionally, water vapor and atmospheric gases absorb another 15 percent. As a global average only about 35-40 percent of the solar radiation entering the atmosphere actually reaches the earth’s surface.
As a practical matter, global averages are of little interest. The essential point is that the atmosphere impacts on the amount of solar energy that actually reaches the earth’s surface - the more atmosphere solar radiation has to move through, the more is lost on the way. In this regard, two celestial events – the daily rotation of the earth and its seasonal tilt of the earth's axis – are important in determining the length of atmosphere through which the sun’s rays must pass before striking any particular location on the globe (Fig. 1).
|

|
| Figure 1. The amount of solar energy reaching the earth's surface is determined by the amount of atmosphere through which it must pass. |
These events set the upper limit amount of solar energy that can reach the surface of the earth at any location on any day of the year.
ENERGY DENSITY
One of the conditions for accurately measuring the Solar Constant requires the intercepting surface to be perpendicular to the sun’s rays. Since solar radiation travels in parallel rays, the perpendicular position identifies the maximum density of rays striking a surface. Any deviation from perpendicular reduces the radiation density and the amount of energy intercepted. This is best illustrated in Fig. 2.
 Figure 2. These illustrations demonstrate how energy density is determined by the angle of incidence. The amount of light emitted by the flashlight is the same in both illustrations but it is spread over a larger area (right) when the light is tilted away from its original perpendicular position (left). Figure 2. These illustrations demonstrate how energy density is determined by the angle of incidence. The amount of light emitted by the flashlight is the same in both illustrations but it is spread over a larger area (right) when the light is tilted away from its original perpendicular position (left). |
The angle created by incoming radiation and a line perpendicular to an intercepting surface is called the angle of incidence. Table 1 illustrates that a fairly large increase in the angle of incidence results in only a modest reduction in intercepted radiation.
RADIATION AND SURFACES
When sunlight strikes a surface it is reflected, transmitted or absorbed, in any combination depending on the texture, color and clarity of the surface. All completely opaque surfaces both reflect and absorb radiation but do so in different ways. For example, a rough surface such as stucco reflects sunlight in a scattered fashion while a smooth, glossy surface reflects uniformly and at an angle equal to the angle of incidence. The wavelengths of solar radiation that are reflected are determined by the color of the surface material. A red stucco surface, for example, will scatter (diffuse) wavelengths in the red band of the spectrum and absorb all others (Fig. 3), while a white glossy surface will reflect all wavelengths in the visible spectrum at an angle equal and opposite to the angle of incidence.
|

|
| Figure 3. Color is perceived when visible light is reflected from a surface. Red surfaces reflect red wavelengths and absorb all others. |
Conversely, a rough black surface absorbs all wavelengths in the visible spectrum, while the transparent surface of window glass allows nearly all radiation to pass through it with comparatively little reflection or absorption, and without deflecting it from its parallel lines of travel. Translucent materials also transmit radiation but scatter the rays as they pass. It should be noted that relatively few materials are excellent reflectors, transmitters, or absorbers of the sun’s rays.
HEAT BEHAVIOR:
HEAT ABSORPTION
Sunlight, in the form of short wave solar radiation, exhibits a transformation from solar energy to heat energy when impacting a material (absorption). The temperatures of a white surface and a black surface exposed the same direct sunlight is a simple demonstration of this conversion. The temperature of the black surface is higher because it is absorbing more solar energy. As solar energy is absorbed at the surface of a material it stimulates movement of the molecules in the material. Molecular movement is measured in terms of heat – the greater the movement, the greater the heat. Since the color black absorbs more of the spectrum than the color white, it will in turn be hotter (more molecular excitement) than white.
CONDUCTION
As a material absorbs radiation and molecular movement continues to accelerate, the heat energy is redistributed through the material due to the natural phenomenon of maintaining equilibrium. This occurs when stimulated molecules, vibrating at a faster rate, impact adjacent molecules vibrating at a slower rate, thereby dissipating and "spreading the wealth". In this way, heat is conducted away from the source of energy as the material seeks to distribute the energy evenly throughout its mass. The rate at which energy flows or is conducted though a material depends on the density of the material and conduction, the rate at which molecules are capable of receiving and passing on energy. Gases are poor conductors; metals are comparatively good conductors; and less dense materials containing tiny air pockets and voids conduct heat at a much slower rate.
HEAT TRANSFER
Heat transfer from a solid material to a fluid medium (liquid or air) occurs by radiation (infrared). It is a continuation distributed molecular "bumping" between a solid material and a transfer medium (air or liquid). The added dimension of using fluids is they can move across a hot solid surface, allowing molecules of the fluid to become agitated (heat), then move away from the heat source, and t be replaced by new, unheated molecules. This process of fluid movement is called natural convection when the movement is unaided by machinery (i.e. hot air rises), and forced convection if the process is aided by a pump or fan.
The process occurs naturally as the molecules of a fluid begin to vibrate when heat is applied, and then becomes less dense (lighter) than the surrounding unheated fluid. The lighter heated molecules rise at a rate determined by the amount of heat applied. Boiling water is a good example of heated molecules near the burner rising quickly to the surface to the point of surface disruption (boiling). Steam generated by the process is simply water molecules whose vibration rate is violent enough to allow them to break from of the water surface.
Birds that seem to hang in the air without beating their wings are evidence of the power of natural convection. On clear sunny mornings, air at the surface of the ground (especially dark surfaces) is heated rapidly and rises in columns with enough force to suspend the bird overhead and even push it upward. The reverse of this process occurs as convected molecules get further from the heat source of heat, give up their energy (slower molecular excitement), and fall. Conduction and convection can be thought of as processes by which solar energy can be both transported and stored.
EMISSIVITY
The principle of solar energy absorption was discussed in terms of two surfaces exposed to the sun. Conduction was then discussed to show how absorbed solar energy moves through a material, always in a direction away from the source of heat to attain equilibrium. NOTE: Any molecular movement is continually generating heat in the form of radiant energy. Unlike solar energy, radiant energy is limited to infrared radiation emitted from a material at low temperatures. The extent to which a material emits thermal energy depends both on the temperature of the material and nature of its surface. Polished metal surfaces are poor emitters and poor absorbers of thermal energy. Again, as with solar radiation, the amount of thermal energy a surface will intercept depends on the angle of the incoming radiation.
Glass has the special characteristic of transmitting nearly all solar radiation that it intercepts (which moves through it) and is less transparent to most thermal radiation. The temperature build-up in a closed car on a sunny but cold day is evidence of this characteristic. Solar energy passes through the windows is absorbed by interior materials, and reradiated into the interior space in the form of thermal energy (heat) which is unable to pass back through the glass to the outside. This has become known as the greenhouse effect.
HEAT STORAGE
All materials can store heat to some degree. The ability of a material to do so is called its specific heat – the amount of heat, measured in BTU’s for a given mass, a material can hold when its temperature is raised one degree Fahrenheit. As an indicator of a material's value as a heat storage medium in solar heating of spaces, the specific heat of a material is not very useful. The usefulness of a material in such an application is determined by its heat capacity, a measurement of the specific heat of a material multiplied by its density. The higher the heat capacity, the more effective the material is for heating and cooling.
Finally, a good storage medium material must absorb heat when it is available, and give I t up when it is needed, and it must be a relatively good heat conductor. In Table 1 the comparative specific heat and heat capacity measurements for a variety of materials is given, and it shows there is no perfect storage medium in terms of volume, storage capacity, and conductivity.
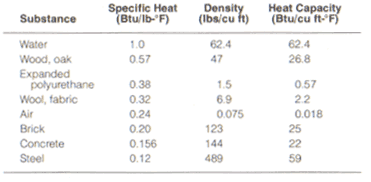 |
| Table 1. Specific heat and heat capacity of various surfaces. |
Next Part: Passive Solar Heating & Cooling Manual, Part 2 of 4 - Passive Solar Architecture - Heating
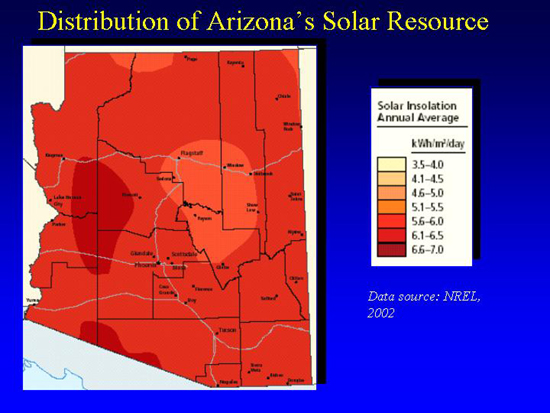







 APS has several large photovoltaic (PV) systems in the desert outside Gila Bend, Arizona. They are now adding energy storage systems to some of these PV systems. There is a good article about these on ABC15.com



 Battery Storage Costs Drop Dramatically, Making Way to a New Era. A recent Rocky Mountain Institute (RMI) report continues to confirm that clean electrification through batteries is advancing at impressive rates. Very interesting report: Breakthrough Batteries- Powering the Era of Clean Electrification


 Arizona Solar Center Mission- The mission of the Arizona Solar Center is to enhance the utilization of renewable energy, educate Arizona's residents on solar technology developments, support commerce and industry in the development of solar and other sustainable technologies and coordinate these efforts throughout the state of Arizona. About the Arizona Solar Center- The Arizona Solar Center (AzSC) provides a broad-based understanding of solar energy, especially as it pertains to Arizona. Registered